Reverse French Manicure, How-to Tutorial, Color Combinations & Designs
French manicure has been a classic manicure trend for ages as more and more women used it because of its color neutrality and simple elegance. However, if you are fed up with your ordinary french manicure, there a few spins to it as well. One such a twist is reverse french manicure.
Reverse French Manicure Color Combinations
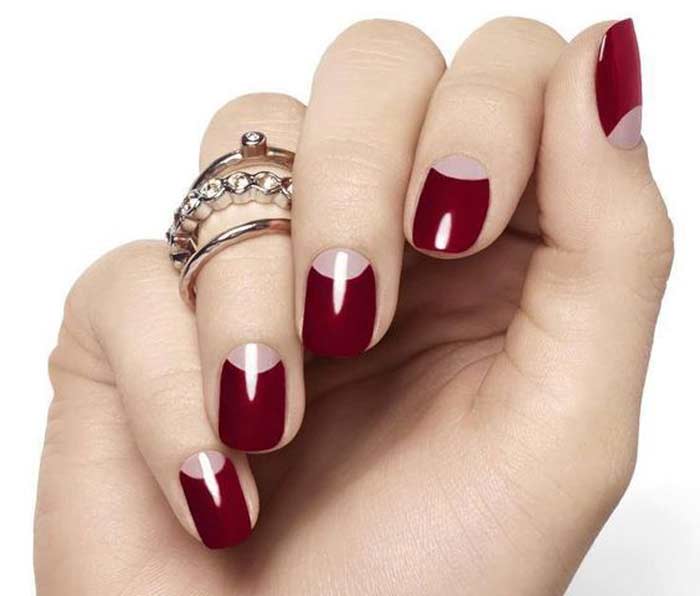
Reverse french manicure as it names suggests is a type of french manicure that has french tips instead of the tips of the nails, as usual, to the bottom part of the nails. The shape and pattern greatly resembles that of a half moon.
Reverse french manicure has two contrasting shades to look evident. Some common as well as not so common contrasting shades people choose are:
- Black and white. This is probably the most popular reverse manicure color combo as it virtually combines two shades that are the total opposite of each other. It also greatly resembles the chinese yin/yan shape minus the swirl and the dots.
- Gold and pink. Gold and pink is another popular reverse manicure combo as it is girly and bright and suits any fair skin toned gal. Darker skin tones can also pull this off as long as they put more gold to cover at least ⅓ of the nails instead of a simple curvy line and fill.
- Silver and black. Metallics have been a quite popular fashion and nail trend and reverse french manicure couldn’t be left out. This popular trend combines black as the base color with silver as the bottom half-moon shade on top for that extra spark. A look that looks like a night with half moon. Another popular yet similar variation of the above is gold in place of silver.
- Red and white. This reverse manicure shade combo is very popular for Christmas and the holiday season and gives off a santa-claus vibe to your nails. Usually, the red is the base color and the white the half-moon bottom shade but the opposite is seen too.
Other less popular but still wearable and unique color shade combos for reverse manicure are: sky blue and white, green and red, purple and gold, blue and yellow, orange and white, blue and pink and gray with nude brown.
If you are not sure which color makes an interesting contrast with another, the most safe way is to choose any color you like as your base color and a metallic silver, gold, or even bronze as your french bottom shade.
How to do Reverse French Manicure Tutorial
Reverse manicure can be done in 2-3 ways depending on the shape you want to achieve, precision, as well as the tools you already have available. Here they are:
How to do reverse french manicure with special stickers
For this way you will need to get some french manicure stickers/dividers, a base coat, your base color in the color of your choice, a nail file, nail clippers, and of course, a contrasting shade for your french bottom tips. The use of stickers here will help give you a more precise and even looking result and this is the method many professionals use.
The steps are as follows:
No 1: Trim/clip your nails to your desired length (ideally ⅓ of an inch to ½ inch above your finger level).
No 2: Shape the edges with a nail file and make sure every nail looks nice and even with the rest.
No 3: Apply your base coat onto each nails and let it dry.
No 4: Apply your base color all over your nails, paying special attention to the top tips of the nail. Let it dry completely on its own or with the help of a hair dryer or nail fan.
No 5: If the color doesn’t look opaque enough, apply a second coat and again, let it dry completely.
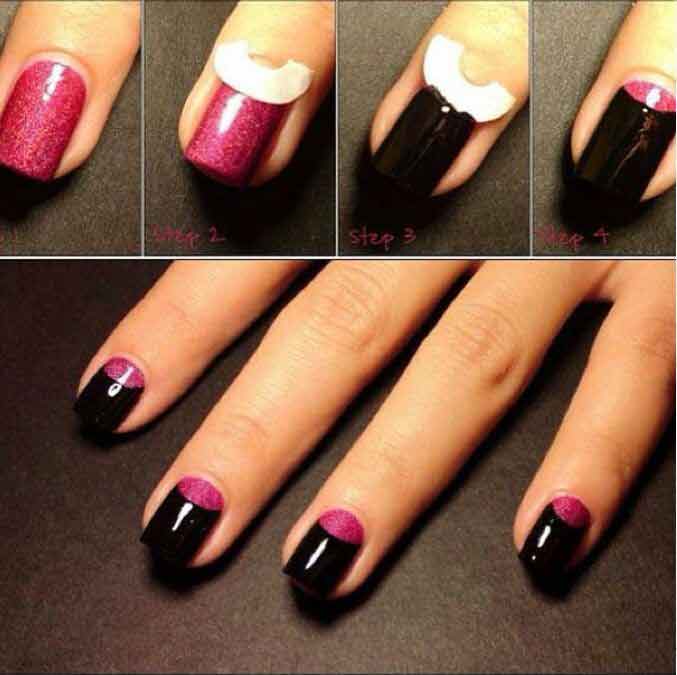
No 6: Apply the french tip/half moon stickers on the bottom third of your nails (the smile/curve side should face ideally the bottom tip of your nails to give a more rounder half moon effect). See the picture here on how to do this exactly:
No 7: Leaving the stickers as your guideline, apply a second color to fill in bottom half moon shape. Let it dry completely before unpeeling the stickers from your nails, otherwise you will end up with a messy shape.
No 8: Peel off the stickers and apply optionally a top coat to finish off your manicure and protect your nails.
Tip: Your base color and well as half moon shade color should be 100% dry before you adhere the stickers or the stickers will take some color off and you may have to repeat the process again.
A small variation of the above method is to only use a base color after you adhere the stickers on the top part of your nails, leaving the bottom half completely blank/transparent.
How to do half moon nails without stickers
The second method of doing your half moon shade, if you don’t have any special stickers available, is to use a bandaid with a round edge or no tool at all and use your fingers as a guideline.
Some professional nail experts and manicurists can achieve a half moon shape simply by swiping off a thin and possibly curvy brush from one side to another. In some french manicure sets the manicure bottle will come with a special curved brush for getting the curve of the tip more accurately. Of course since you are going for a reverse french manicure, the direction of the brush should be opposite to get a half moon shape.
Tip: If you are going for a fancier and more unique reverse french manicure design, try applying some nail beads or glitter lines just above the line that separates the two contrasting colors. This should also add more contrast and definition.
Now in regards to the best reverse french manicures colors, there is no reverse french manicure set in the market so you need to buy each color and tool separately to achieve the results you want.
Reverse French Manicure Designs Gallery
More on French Manicure
- Pink french manicure white tip light pink, base best designs & Polishes
- Black French Manicure, How to do, White, Pink Tip Nails & Designs
- French Manicure with Glitter, Gold, Silver line Designs
- How to do DIY French Manicure at Home short nails without strips tape
Originally posted 2020-12-30 10:14:14.


